WP-News Vol 1 Issue 2 June 2013
What is up with the two editor Options?
As we all know the WordPress Editor, even with enhancement plug-in, is not a WYSISYG editor, but the visual editor does allow one to mark up text and do other formatting without the need to know HTML. It is, after all, HTML that is the underlying foundation for content markup. So, the visual editor is a cross between a word processor and an HTML markup utility. It offers markup options that writes the HTML for you.
When editing remember to view your progress. While one can use the preview file option in the editor I find it better to have 2 browser tabs open. Not all features will properly display in the preview mode so have an edit tab and a view tab.
For most things sticking with the visual editor is just fine, but on some occasions it is very important to use the Text editor. The text editor is a slimed down HTML view of the content. It will not show you everything like paragraph tags (unless you have configured a plug-in to show them), but it will show most other HTML and sometimes you have to use HTML to get the exact effect needed.
Some things have to live in Text mode, like code captured and pasted from a third party, perhaps a paypal button or embed code for a YouTube video. In these cases the text view must be used or the visual editor will trash the code.
Important:
If you have to past short code, or paste code captured from something else, then do so in the text view and make sure to save the file while in the text view. This will ensure that the raw code is not re-written by the WordPress visual formatting.
Continuing Education
I am always talking about plug-ins that enhance WordPress. Sure there are thousands and some are good and some not so much. How do you sort out the good from the bad? The simple answer is check to see how many downloads for that app there has been. Check reviews and check to see when it was last updated. Also, and this could be important, see if there is a professional (buy it) version. That will go a long way to ensure that he plug-in will continue to be supported.
Once you have a plug-in you really want, then all you have to do is install. But of course nothing is that simple.
- Step one: Find the name of the plug-in you want
- Step Two: Go to dash board find plug-in button at left, click to expand and click Add New
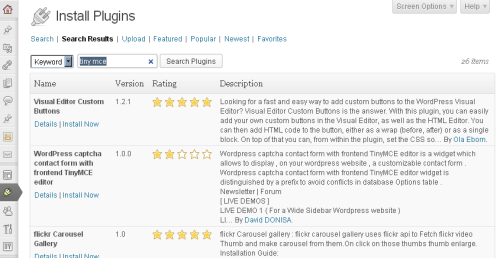
- Step Three: put the name into the search box. If you have the right name, or near enough, you will get a result. You will see the name of the plug-ins that match the search a blurb for each and beneath the name Details / Install. Make sure to check details to find out if the plug-in really works with your version of WordPress.

- Step Three: Click install.
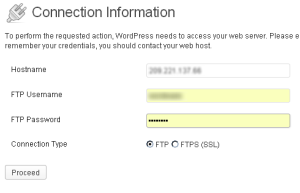
 Step Four: Fill in the Connection Information Form
- Hostname (If a Zipcon customer this will be your URL or DNS number)
- FTP Username (Provided to you when you setuphosting account.)
- FTP Password (Provided to you when you setup hosting account)
- Connection Type (Most cases should be ftp)
- Step Five: Click Proceed
- Step Six: Click Activate or Return to Plug-in list
An installation is not the same as activation. You might have a mix of active and inactive plug-ins in your plug-in list. Most plug-ins will need some setup and that the developer may have a link to their support site.
If you don’t have your ftp info or can not easily find it ask me. I have a record for each of our clients and unless ftp info changed I can find it for you. If your hosting has changed, then you will need to contact your host to get your FTP info.
How to pick a plug-in?
Not all plug-ins are created equal. They run the gamut from donation ware (technically free) to professional applications you buy. The main difference between donation ware and professional is the amount of support you can expect. That is not to say that a free plug-in will have no support, or even need it, but you need to make an informed choice before you adopt that cool new plug-in.
1. If you are looking the the WordPress Plug-in site (http://wordpress.org/plugins/) for just the right application make sure to check the number of downloads and when the plug-in was last updated. This can help you decide between two or more similar plug-ins.
2. Check to see if the developer offers a “pro” version. Such a version will have more features and cost money. However, it should also come with support. The trajectory of a donation-ware plug-in is to be good enough to get a following and then product a pro version.
3. Install it and poke at it. Is it easy to use.? Does it break any other plug-ins you are using (yes that happens)?
Featured Plug-ins
Image Map Popup Boxes
- This easy to use application allows the administrator to create an image map with built in pop up content boxes. It only comes in a pro version but the cost is very reasonable considering if you pay a coder to do a one off image map with popup boxes you will pay far more.
http://imagehotspotter.com/
Link Checker
- If you like to put links in your text content. Meaning you link to other sites or even to pages within your site structure you need to know about link rot. Link rot is when a URL changes but your link code remains the same. Link rot was hard to keep track of in WordPress until now. This plug-in will run a report to find any links that are broken.
http://wordpress.org/plugins/broken-link-checker/
Survey and Feed Back Made Easy
- There are many survey systems and they range from simple to complex and from free to expensive, but this plug-in is a nice balance between features and ease of use. The free version has enough functionality for most modest needs, but the developer offers a pro version that can handle more demanding demographics and survey needs.
http://wordpress.org/plugins/wp-feedback-survey-manager/
http://www.intechgrity.com/wp-plugins/wp-feedback-survey-manager/